


Shoulder injuries are extremely common with athletes participating in paddle and racket sports.
This is because of many factors, including overuse, improper movement when hitting overhead shots, and even falls on outstretched arms. Common pickleball shoulder injuries include dislocated shoulders, collarbone fractures, rotator cuff tears, humeral fractures, and scapular fractures.
Unfortunately, many of these orthopedic injuries to the shoulder joint cannot be managed with conservative treatment and require surgical intervention. Even with surgery and rehabilitation such injuries frequently result in chronic pain, limitation of mobility, and impaired function.
Common pickleball shoulder injuries
To better understand how one can prevent shoulder injuries, it’s important to understand the most common shoulder injuries racket players experience.
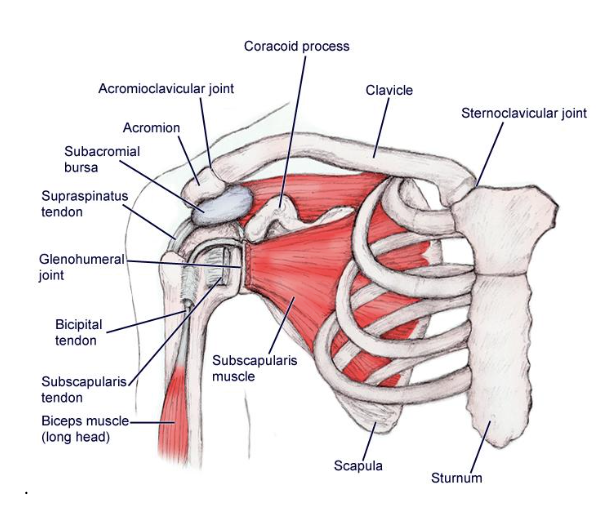
- Fractures of the clavicle or collar bone: The clavicle is part of the shoulder girls that helps support and stabilize the arm. The clavicle allows the arm a full range of motion and transmits impact from the arm to the body. This bone is frequently injured by falls on the pickleball court when players land on their shoulder or outstretched arm.
- Acromioclavicular separations (AC joint): This type of separation frequently occurs when players fall directly on their shoulder. There are three grades of separation. The first is a stretched AC joint with pain and swelling. Grade two is a widening of the joint with increased pain and swelling. Grade three is a complete disruption of the join with tremendous pain and swelling.
- Shoulder dislocations: The shoulder can dislocate with trauma, usually caused by falling or running into another person. A shoulder dislocation is painful and renders the shoulder useless.
- Rotator cuff tears: Overuse can result in tears of the rotator cuff. Tears are usually signified by an inability to raise an arm directly up at the side.
- Strains/sprains, tendonitis, and other inflammatory problems: These injuries are most commonly seen either from trauma, overuse, or improper
- technique. Ice should always be used when there is pain, decreased mobility, and swelling
- “Frozen shoulder” or adhesive capsulitis: This injury frequently occurs for no apparent reason, however, it can occur as the result of a traumatic injury or following shoulder surgery. This condition causes extreme stiffness that limits motion in the shoulder.
Exercises to help strengthen and rehabilitate your shoulder
When shoulder injuries first occur, players should complete easy rehabilitation exercises. As strength, stability, and range of motion increase, additional resistance can be applied with weights and bands.
Early stage exercises
The goal of early-stage exercises is to reestablish a pain-free motion, prevent muscle atrophy, and stabilize the bony and soft tissue structures in the shoulder. These exercises should be performed for 10-15 minutes several times a day.
- Pendulum swings: While holding onto a table or chair for stability, bend forward a little and dangle your injured arm straight down. Slowly use your legs and hips to create momentum that allows your arm to swing in circles — you should not use your arm muscles to move. Start with small circles and gradually increase the size as pain allows.
- Wall crawls: Stand with your shoulder about two feet away from a wall. Raise your arm to chest height and then gently walk your fingers up the wall as high as you can. Hold for a few seconds and walk them back down. Repeat five times.
- Front raises: Stand with your feet hip width apart. Slowly bring your arm up to chest height. Hold for a few seconds before slowly lowering back down.
- X raises: Standing with your feet hip width apart, cross your arms in front of you so that they make an X. Slowly raise them to shoulder height on either side. Hold for a few seconds and lower back to the starting position.
- Laying arm raises: Lay flat on your back with your knees bent and your arms at your side. Slowly raise your arm to reach behind your head. Lower your hand as close to the floor as possible before returning to the starting position.
Advanced stage exercise
After you have regained mobility, you can begin to incorporate advanced shoulder workouts into your regime. Start off slowly, gradually increasing resistance and repetitions. These resistance exercises should be done two to three tiimes a week for approximatley 30 minutes. Aim to complete two to three sets of each exercise with 10-20 repetitions each.
- Prone shoulder flies: Laying with your chest on an exercise ball with your feet stretched behind you for stability, start with light dumbbells touching the ground in front of you. Slowly raise your arms out to the side at shoulder height. Hold for a few seconds before lowering back down.
- Lateral dumbbell raise: Start seated with good posture on a medicine ball or bench. Lower your dumbbells to either side of your legs and then raise them to shoulder height at a 45-degree angle in front of you. Hold for a few seconds, careful not to lock your elbows, before lowering back down.
- Standing band fly: Grab a resistance band and stand with your feet hip width apart. Hold the band out in front of you at shoulder height. Slowly stretch the band so that your arms are open wide. Hold for a few seconds before gently returning to the starting position.
- Diagonal band stretch: Stand with your feet hip width apart. Hold the resistance band with your right hand near your right hip. Stretch your left arm diagonally across your body. Hold for a few seconds before returning to the starting position.
- Kneeling shoulder extension: Kneel on the ground in a tabletop position. Place the resistance band under your left hand. Balancing on your knees and your left hand, slowly use your right arm to raise the band out to your right side. Hold for a few seconds before lowering back to the starting position.