


It comes as no surprise that neck and upper back pain and problems are commonly reported injuries associated with pickleball and other paddle and racket sports.
Neck and back pain can be caused or exacerbated by several factors, including rapid changes in position, poor conditioning, falls, and pre-existing anatomical and physiological factors.
While playing, frequent movement combined with quick starting, stopping, and changes in position can produce an inflammatory response, leading to muscle fatigue and pain with trigger points.
Over time, this can lead to clinical injury resulting in weakness, loss of flexibility, chronic pain, and even degenerative changes. That’s why it’s important to strengthen and stabilize the neck, shoulders, and upper back muscles.
Prevention: Strengthening exercises for the neck and upper back
Strengthening the core muscles that you use during a pickleball match can help you avoid injury that leads to trauma and inflammation.
The following exercises will help to strengthen and stabilize the supporting muscles in the neck, shoulders, and upper back.
Shoulder exercises
The first group of exercises is aimed at strengthening your shoulder, chest, and neck muscles. These can be performed standing or seated on a couch, but for additional strength benefits, use an exercise ball to improve your balance and coordination.
Beginners should start with 1-5 pound dumbbells and slowly increase weight as fitness and strength improves. Aim to complete three sets of 15-20 repetitions of each exercise.
- Exercise 1: Lateral raises — Sit on the exercise ball with your feet flat on the floor. Start with your arms relaxed at your side, then slowly exhale as you raise your arms out to either side until they are parallel to the floor. Hold at the top for a few seconds before inhaling as you lower your arms back to the starting position.
- Exercise 2: Shoulder presses — Sitting up tall on the ball with your feet flat on the floor, start with your dumbbells near your shoulders and your palms facing away from you. As you exhale, push your arms straight up above your head until they are straight. Do not lock your elbows. Inhale and slowly lower to the starting position.
- Exercise 3: Chest flys — Lay back on the ball so that your back and glutes are supported. Keep your feet flat on the floor. Start with your dumbbells stretched straight over your chest. Keeping a slight bend in your elbow, open your arms to either side of your body as you inhale. Then, exhale and squeeze through your chest to raise your arms back up.
- Exercise 4: Bicep curls — Sit up straight on the ball with your feet flat on the floor. Squeeze your elbows close to your waist. Keeping your elbow close to your body, slowly raise your right arm to meet your palm to your shoulder, or as close as you can get. Slowly lower back to the starting position and repeat with your left arm.
Back exercises
This group of exercises is aimed at strengthening your back muscles. They can be performed without weights, but as you progress through the exercises, you can add a light weight, only one or two pounds, to each. Aim to complete three sets of 12-15 repetitions of each exercise.
- Exercise 1: Trunk raises — Lie on the floor with your stomach flat on the ground. Lightly place your hands on the back of your head with your elbows out to the sides. Arch your back to slowly raise your chest of the ground. Hold for 5-10 seconds before slowly lowering back down. When you’ve strengthened your muscles, you can hold a light weight behind your head for this exercise.
- Exercise 2: Ball half circles — Lie on an exercise ball with the ball under your lower back. Your shoulders should be off the back of the ball and your feet should be flat on the ground. Using a medicine ball or a set of dumbbells of no more than 5-10 pounds, start with both hands stretch behind your head. Slowly raise the ball over your head and bring it toward your abdomen to draw a half circle in the air. Return to the starting position, but be careful to not lock your elbows or over extend your arms.
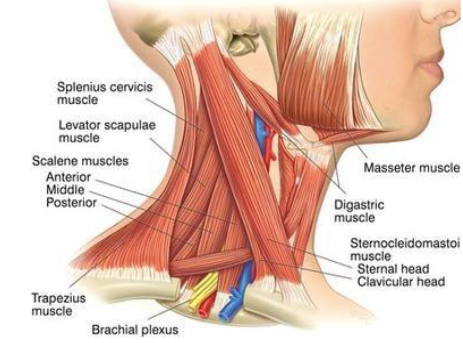
Trigger points: A common cause of upper body pain
A very common cause of neck and upper body pain and tightness is trigger points. Trigger points are painful buildups of waste materials, such as hyaluronic and lactic acid adjoining muscles, tendons, and fascia caused by overuse and injury.
The soft tissue of the neck, upper back muscles, and scapular borders are one of the most common areas in the body to get trigger points because these muscles are constantly working to support the head, adjust posture, and assist with the shoulder muscles.
Trigger points produce pain locally and in a referred pattern that can mimic other musculoskeletal problems. The symptoms can range from mild pain to severe burning and discomfort, and the pain commonly radiates.
There are numerous and varied methods of treatment for a myofascial pain syndrome, ranging from pharmacologic agents, injections, physical therapy modalities, manipulation, massage, acupuncture, laser therapy, and manual therapy.
How to alleviate trigger points on your own
You can self-treat trigger points in your neck and surrounding soft tissue by using acupressure over the area.
Once you have found a trigger point, press down on it with your thumb while slowly increasing the pressure for 90 seconds. Release the pressure, gently rub the area and stretch the neck gently.
Another effective method of self-treatment is to lie on the floor and put pressure on the affected area with a tennis or pickleball ball.


