


referred you!
Shop and spend $50+ to get your free gift. Free gift will be added at checkout. Valid for new customers only.
Shop Best Sellers NowWe're sorry, self-referrals are not allowed.
We're sorry, but the referral link you used is not valid.
Notify Me
Thank you!
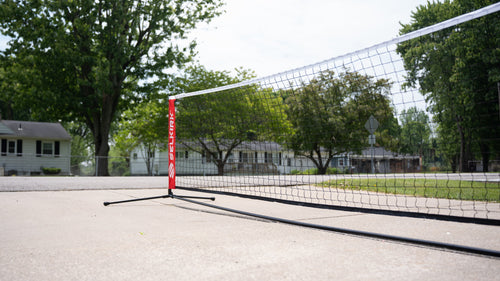
How to assemble your Prime SLK Pickleball Net with wheels
Are you excited to set up your SLK Pickleball Net with wheels and hit the court?
Many public pickleball courts require players to bring their own net, and the SLK Pickleball Net is a perfect option.
This lightweight, portable net is designed for convenience and easy setup, ensuring you spend more time playing and less time assembling.
What's inside the bag?
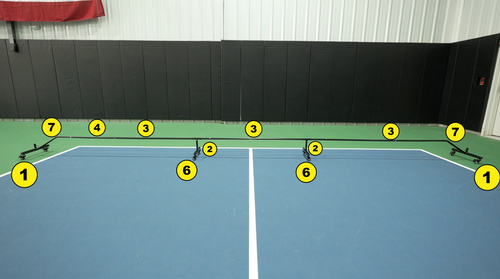
Inside your bag, you'll find all the components necessary to assemble your net. Here's what you can expect:
- 2 feet with wheels (labeled number 1)
- 2 support legs (labeled number 7)
- 2 support feet with wheels for the middle of the net (labeled number 6)
- 2 "T" bars (number 2)
- 1 connecting middle crossbar (number 4)
- A set of 6 other bars to finish off the bottom crossbar of the net (number 3)
- Additionally, you'll find:
- 1 net
- 2 skinny rods to help hold up the net (labeled number 8)
- 2 rods with a sealed cap on top to make the net posts (labeled number 5)
Step 1: Building the end feet
Begin by assembling the ends of the base. Take the long, rectangular foot pieces labeled with number 1 and insert their corresponding legs labeled with number 7. Ensure the rods are inserted fully by listening for a click.
Step 2: Middle support feet
Now, assemble the middle support feet. Insert the "T" rods into the middle support feet so they're perpendicular. You'll know they're securely in place when you hear the click from the push button on the "T" rod. Place these support feet between the end feet to prepare for the next step.
Step 3: Middle support bar
Grab the 6 middle crossbars labeled with number 3. These bars form the majority of the bottom crossbar of the net. Slide them into the loops of the "T" bars in the middle of the feet you just assembled.
Assemble three bars together first, then add the middle feet. Attach the remaining crossbars and one end foot with wheels, locking the wheels in place to prevent the net from rolling.
Step 4: Completing the crossbar
Attach the singular crossbar labeled with number 4 to complete the base of the net. Use it to connect the remaining end leg to the base crossbar. Lock the wheels on this end to stabilize the base.
Step 5: Attaching the net
Now it's time to attach the net. Insert the rods into the slots at both ends of the net, then carefully push down the net posts into the slots on the feet at either end. Ensure they're securely in place with the push button.
Insert the middle rods into the skinny sleeves in the middle of the net, then place the other end of those rods into the loop in the center feet to keep them stable.
Finally, loop the straps of the net to the top of the net post and secure them with the velcro to keep the net taut.
And there you have it! Your SLK Pickleball Net with wheels is ready for action.
More Content for You

Search for a specific topic or browse by the categories below.
All Content


Can't find what you're looking for?
LET US KNOW WHAT YOU'D LIKE OUR NEXT VIDEO TO COVER!
Submit an Idea